Turbine flowmeters are highly accurate instruments that measure flow by detecting the rotational speed of a turbine placed in the flow path. As the fluid moves through the pipe, it spins the turbine, and the speed of rotation is proportional to the flow velocity. They are widely used in oil, natural gas, chemical, food, pharmaceutical, and water management industries.

WORKING PRINCIPLE

The fluid flow turns the turbine rotor, and its rotational speed corresponds to the volumetric flow rate. Magnetic or optical sensors detect the rotor’s movement and convert it into an electrical signal.

Basic equation:
Q = k · N

Where Q is the flow rate (m³/s), k is the calibration constant, and N is the number of turbine revolutions per unit time.

STRUCTURAL FEATURES

  • Material: stainless steel, aluminum, or special alloys
  • Rotor: aerodynamically designed to minimize resistance
  • Bearings: sapphire or tungsten carbide for long life and low friction
  • Output: Pulse signal, 4-20 mA, HART, Modbus

ADVANTAGES AND LIMITATIONS

Advantages:

  • High measurement accuracy (0.2% – 0.5% error)
  • Wide flow measurement range
  • Suitable for both gases and liquids

Limitations:

  • Accuracy decreases with viscous or contaminated fluids
  • May be unstable at very low flow rates
  • Requires periodic calibration and maintenance

APPLICATION AREAS

  • Fuel measurement in oil and gas industry
  • Natural gas consumption monitoring in power plants
  • Flow control in water management and treatment facilities
  • Measurement of liquid raw materials in food and pharmaceutical industries

STANDARDS AND CALIBRATION

  • ISO 9951: Turbine meters for gas flow measurement
  • AGA reports: Standards for natural gas measurement
  • API and ASME compliance
  • Regular calibration required to maintain accuracy

CONCLUSION

Turbine flowmeters provide exceptional accuracy and reliability in industrial flow measurement. With digital communication protocols, they can be seamlessly integrated into SCADA and automation systems, playing a vital role in process optimization and monitoring.
Metal tube flowmeters are robust instruments designed for accurate flow measurement under high pressure, high temperature, and aggressive fluid conditions. Compared to glass tube rotameters, they offer greater durability and are widely used in chemical, petrochemical, power generation, water treatment, food, and pharmaceutical industries.

Metal Tube Flowmeters and Industrial Applications

WORKING PRINCIPLE

They operate on the variable area principle. As the fluid flow increases, the float rises. In metal tube designs, the float position is detected either by magnetic sensors or mechanical indicators.

Fundamental equation:

Q = C · A(h) · √(2ΔP / ρ)

Q: flow rate, C: coefficient, A(h): cross-sectional area depending on float position, ΔP: pressure drop, ρ: fluid density.

STRUCTURAL FEATURES

  • Measuring tube: stainless steel or alloy steel
  • Float: selected with different densities for higher accuracy
  • Indicators: Mechanical (pointer type) or electronic (4-20 mA, HART, Profibus)
  • Operating range: up to 100 bar pressure and 400 °C temperature

ADVANTAGES AND LIMITATIONS

Advantages:

  • Reliable under harsh process conditions
  • Suitable for both liquids and gases
  • Easy integration with automation systems through electronic outputs

Limitations:

  • More expensive than glass tube models
  • Limited direct visual observation, relies on indicators

APPLICATION AREAS

  • Acid/alkali measurement in chemical and petrochemical plants
  • Steam and condensate flow monitoring in power plants
  • Chemical dosing control in water treatment facilities
  • Hygienic process monitoring in food and pharmaceutical industries

STANDARDS AND CALIBRATION

  • ISO 5167: Flow measurement standards
  • ASME MFC: Standards for flow measurement devices
  • ATEX-certified versions: For explosive atmospheres
  • Regular calibration required to maintain accuracy

CONCLUSION

Metal tube flowmeters play a vital role in modern industry due to their durability and reliability. By combining with digital technologies, they can be seamlessly integrated into automation systems, contributing to process optimization and efficiency.

Flow indicators are devices that provide a visual means of observing liquid or gas flow within pipelines. Unlike flowmeters, which measure the quantity of flow, flow indicators are designed to confirm the presence, direction, and sometimes the quality of flow. They play a simple yet crucial role in process safety, maintenance efficiency, and fault detection.

Flow Indicators and Industrial Applications

WORKING PRINCIPLE AND TYPES

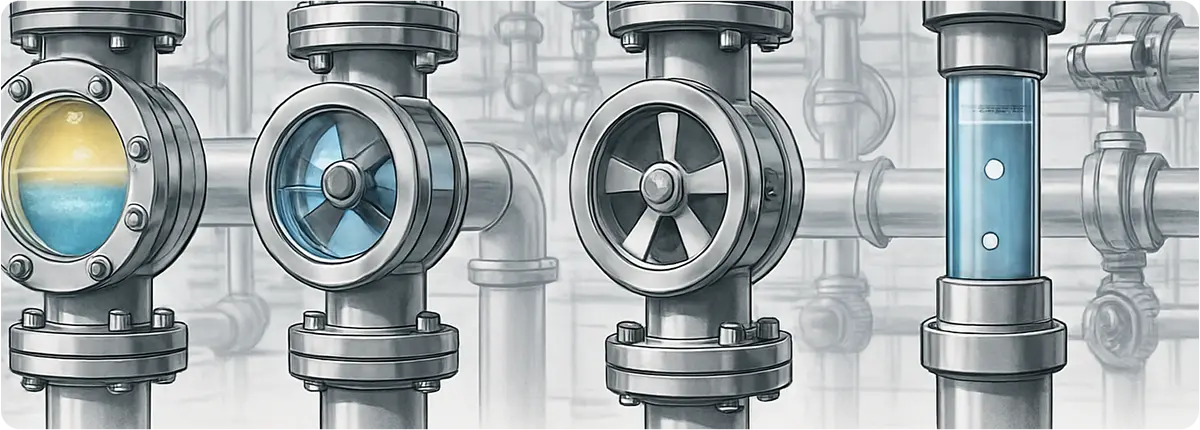
  • Sight Glass Indicators: Transparent glass or plastic tubes mounted on pipelines for direct visual observation.
  • Paddle Type Indicators: A mechanical paddle rotates or moves with the flow.
  • Gear/Turbine Indicators: Flow is confirmed through the rotation of small gears or turbines.
  • Bubble Type Indicators: Gas flows are monitored by observing bubble movement.

TECHNICAL FEATURES AND SELECTION CRITERIA

  • Material selection: Borosilicate glass, stainless steel, PTFE
  • Pressure and temperature resistance
  • Connection types: flanged, threaded, welded
  • Optional features: illumination, dual-sided viewing

ADVANTAGES AND LIMITATIONS

Advantages:

  • Simple and cost-effective design
  • Quick visual confirmation of flow
  • Easy maintenance

Limitations:

  • Does not provide precise flow measurement
  • Limited use with high-pressure or hazardous fluids
  • Observation windows may become contaminated over time, requiring cleaning

APPLICATION AREAS

  • Pump outlet monitoring in water and wastewater treatment plants
  • Flow verification in chemical and petrochemical processes
  • Hygienic pipeline monitoring in food and pharmaceutical industries
  • Cooling water flow monitoring in HVAC systems

STANDARDS AND SAFETY

  • ASME BPE: Standards for hygienic process equipment
  • ISO 9001: Quality assurance practices
  • Sight glass design requirements for pressurized vessels

CONCLUSION

Flow indicators are critical devices for enhancing process safety and simplifying maintenance in industrial plants. Modern versions can be integrated with digital sensors, allowing connectivity to SCADA systems, thus combining visual monitoring with advanced process control.

Flow measurement is one of the most essential parameters in industrial processes. Accurate flow monitoring ensures energy optimization, process safety, and product quality. Variable area flowmeters, most commonly represented by rotameters, are widely used due to their simplicity and reliability.

Flow Measurement Techniques

WORKING PRINCIPLE

A variable area flowmeter consists of a tapered tube with a float inside. As fluid flows upward, the float rises until the upward force of the fluid balances with gravity. The position of the float corresponds to the flow rate, which can be read directly.

Q = C · A(h) · √(2ΔP / ρ)

Where Q is flow rate (m³/s), C is discharge coefficient, A(h) is the cross-sectional area depending on float height, ΔP is pressure drop, and ρ is fluid density.

MAIN COMPONENTS

  • Tapered glass or metal tube
  • Float element
  • Scale and indicator system
  • Optional: Electronic sensors and transmitter integration

ADVANTAGES AND LIMITATIONS

Advantages:

  • Simple and robust design
  • Direct visual reading
  • No external energy required

Limitations:

  • Sensitive to viscosity and density variations
  • Cannot be used in horizontal pipelines
  • Limited accuracy in high-precision processes

APPLICATION AREAS

  • Water and wastewater treatment plants
  • Chemical industry for liquids and gases
  • Laboratory environments for low flow rates
  • Food and pharmaceutical industries for basic process control

STANDARDS AND CALIBRATION

  • ISO 5167: Flow measurement devices
  • OIML R117: International metrology standard for liquid flow measurement devices
  • Periodic calibration is required to ensure accuracy

CONCLUSION

Variable area flowmeters remain widely used due to their low cost, simplicity, and reliability. The introduction of electronic rotameters has enabled digital monitoring and integration with SCADA systems, making them more versatile in modern industries.

Flow measurement is one of the most fundamental parameters in industrial processes. Accurate flow measurement is essential for production efficiency, energy optimization, process safety, and product quality.

Flow Measurement Techniques

PRINCIPLES OF FLOW MEASUREMENT

Flow rate is defined as the quantity of fluid passing through a cross-sectional area. The basic formula is:

Q = A · v

Where Q is volumetric flow rate (m³/s), A is cross-sectional area (m²), and v is flow velocity (m/s).

Mass flow rate can be expressed as:

ṁ = ρ · Q

Where ṁ is mass flow rate (kg/s), ρ is fluid density (kg/m³).

TYPES OF FLOW MEASUREMENT DEVICES

  • Orifice Plates: Simple and cost-effective, but with higher pressure losses.
  • Venturi Tubes: Provide higher accuracy with lower pressure drop.
  • Pitot Tubes: Suitable for gases and low-viscosity fluids.
  • Electromagnetic Flowmeters: Highly accurate for conductive liquids.
  • Ultrasonic Flowmeters: Offer non-contact measurement.
  • Mass Flowmeters (Coriolis): Directly measure mass flow with high precision.

FACTORS AFFECTING MEASUREMENT ACCURACY

  • Changes in fluid temperature and viscosity
  • Pipe diameter and roughness
  • Installation position of the flowmeter
  • Calibration and maintenance issues

STANDARDS AND CALIBRATION

  • ISO 5167: For orifice, venturi, and nozzle-based flow measurement devices
  • ISO 4185: Standard for flowmeter calibration
  • ISO 17025: Accreditation for calibration laboratories

APPLICATION AREAS

  • Flow monitoring in water and wastewater treatment plants
  • Steam and fuel flow measurement in power plants
  • Reactor and pipeline flow control in chemical industries
  • Liquid flow control in food and beverage industries

CONCLUSION

Flow measurement systems are critical for ensuring reliable and efficient production in industrial plants. Proper device selection, correct installation, and regular calibration guarantee process continuity and safety.

In industrial facilities, efficiency, safety, and product quality depend heavily on the ability to measure, monitor, and control process variables. The systems designed for this purpose are known as measurement and control systems. From oil and gas refineries to food production plants, from power generation facilities to wastewater treatment, these systems form the backbone of industrial automation.

By implementing advanced measurement and control systems, plants achieve:
– Improved energy efficiency
– Standardized product quality
– Enhanced operational safety
– Reduced environmental impact.

Süreç İmalatında Öngörücü Bakım

THE IMPORTANCE OF MEASUREMENT AND CONTROL SYSTEMS

Every industrial process operates within a defined range of parameters. Deviations in pressure, temperature, flow, or level can result in energy waste, equipment damage, production losses, and even safety hazards. For this reason, measurement and control systems are often referred to as the ‘heart’ of industrial operations.

CORE COMPONENTS AND OPERATING PRINCIPLE

A measurement and control system typically consists of three main components:

Sensors / Transducers: Convert physical quantities into electrical signals (e.g., thermocouples, pressure transmitters, ultrasonic level sensors).
Controllers: Compare measured values with set points and generate control signals (e.g., PLCs, DCS, PID controllers).
Final Control Elements: Act directly on the process (e.g., control valves, actuators, motors).

Principle: The chain of Sensor → Controller → Final Control Element establishes the feedback loop that keeps the process stable.

CONTROL THEORY AND PID REGULATION

The most widely used algorithm in process industries is the PID controller, expressed by:

u(t) = Kp * e(t) + Ki ∫ e(t) dt + Kd * de(t)/dt

• e(t): Error signal (set point – measured value)
• Kp: Proportional gain (fast reaction)
• Ki: Integral gain (eliminates steady-state error)
• Kd: Derivative gain (responds to sudden changes)

Example: In a chemical reactor, poor PID tuning may cause runaway exothermic reactions, risking both product quality and plant safety.

KEY PROCESS VARIABLES

Pressure Measurement: Devices include Bourdon gauges, strain gauge sensors, and differential pressure transmitters.
Formula: P = F / A (Force per unit area)

Flow Measurement: Techniques include orifice plates, Venturi tubes, ultrasonic and magnetic flowmeters.
Fundamental relation: Q = A * v (Flow = cross-sectional area × velocity)

Temperature Measurement: Methods include thermocouples (Seebeck effect), RTDs (resistance change), and infrared sensors.
RTD relationship: R(T) = R0 * (1 + α * ΔT)

Level Measurement: Techniques include float, hydrostatic pressure, radar, and ultrasonic sensors.
Hydrostatic formula: h = P / (ρ * g)

INDUSTRIAL APPLICATIONS

Petrochemical Industry: Pressure and temperature control in distillation columns.
Power Plants: Boiler drum level and steam pressure regulation.
Food and Beverage: Pasteurization systems requiring precise temperature and flow control.
Water Treatment: Tank level monitoring and pH regulation in wastewater plants.

STANDARDS AND SAFETY REQUIREMENTS

Compliance with international standards is essential for reliability and safety:
– IEC 61511: Safety systems for process industries
– ISO 5167: Flow measurement standards
– ASME & API standards: Specific rules for oil and gas operations

CONCLUSION

Without measurement and control systems, modern industries could not operate safely or efficiently. Proper sensor selection, accurate controller tuning, and reliable final control elements are the foundation of industrial automation.

In the upcoming articles of this series, we will explore pressure, flow, temperature, and level measurement systems in greater technical depth.